Final Portfolio

Tree Cactus 7 x 11 in.
Red Earthenware Clay
Low Fire Glaze and Textured Glaze
Matthew 7:8 Cylinder 4 x 2.5
Red Earthenware Clay
Low Fire Glazes
Sea Bowl
1.5 x 4 in.
Red Earthenware Clay
Low Fire Glaze
Fade Ring Bowl 1.5 x 2.5
Red Earthenware Clay
Low fire glazes
Lantern/ Oil Burner 3 x 6
Red Earthenware Clay
Textured Glaze


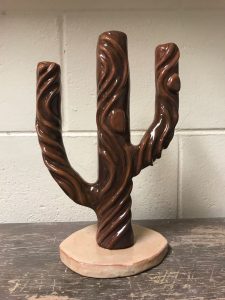
The Tree Cactus : Up Close Project

For this project, I chose to use two different plants to tie into one… the cactus and the tree.  The finished project,  ‘up close’ it looks to be a branch and when you zoom out you can see its a cactus.  Artist Reflect:  This was my 2nd to last  project.  Analyzing my work I have seen my progress, from the piece becoming smooth, to the layering and blending of the glazing. I have learned smoothing and glazing techniques.  For smoothing, I would not only use my hands but also the wooden tools provided to get into small curves and crevices.  For glazing, I learned how to layer the glazes properly so that they would blend well.  Artist Create:  As you may see in the picture, the “veins” of the tree are actually projecting off of the vessel itself.  I used a coil technique to bring the “branch” idea more alive.  Smoothing it was a challenge and took time but it definitely payed off.

_____

Matthew 7:8 Cylinder

This was my second slab project.  After running my slab through the slab roller, I used a fettling knife get the correct size and square shape needed for this project.  After the clay was wrapped correctly around the cardboard cylinder I used the serrated-edge scraper and smooth-edge scraper to make this piece very smooth so the sgraffito would been easily visible.   I used under-glaze instead of a regular low fire glaze so that I could sgraffito onto the vessel.  After the sgraffito was finished and it came out of the kiln the first time, I used a clear glaze to make this piece come out shiny, very appealing.

_____

Sea Bowl

This was my 3nd coil bowl.  I was having issues making the bowl round and smooth.  Instead of starting over I decided to work with the piece and give it a curvy “wave” lip.  I used two different shades of blue to give the bowl an ombre effect to show some of the different colors of the ocean.

_____

Fade Ring Bowl

This was my 2nd coil bowl.  You can actually see the “ridges” in the bowl where the coils were joined.  At first this is not how I wanted it to appear though it ended up having a nice texture and look.  I used two different greens for a fade effect.

_____

Lantern/Oil Burner

This is my final project, the second attempt (the first idea actually being the 2nd attempt.. being the successful project).  Originally I had wanted to carve an elephant into the cylinder, but had decided it would end up being a thicker carve which would pull lots of light and heat out.  Therefor, I decided to carve a thinner safari  animal -the giraffe.  Being excited and not thinking ahead I did not realize after carving out the giraffe around its tall legs, how thin the remaining clay would be in between the carvings.  One of the problems I ran into was making sure those areas would dry without cracking or falling off. Now, the other problem being the oil tray.  In the beginning I was very satisfied with my oil tray but decided to trim it when it was leather dry and I actually ended up poking through to the other side.  I proceed to make another one which the walls ended up being too thin but I decided to try it anyhow.  Hmmm.  All was fine UNTIL it was bone-dry and I decided to take it outback to take a lovely picture.  Only until after taking the picture did I realize one of the thin areas in between the carvings had popped off.  I came back inside disappointed with the results and set my piece down, that is when the oil tray decided to crumble…. yippe.  It was clear I needed to re-start.  For the second attempt, I went with the first idea, the elephant.  After all it is my favorite animal.  The results are seen above.  I am overall satisfied… though the elephant is a bit round, I think it shall be just fine with the amount of heat and light that will come out.

NOTE: NEVER TRUST THIN WALLS.


Blog #10


I had a couple ideas for this project.  The first being a 4 sided flat slab lantern.  I made my maquette and decided I no longer liked the shape.  I then thought to use one big slab to make a round vessel, a cylinder.  To take it a step further I decided to not only make a lantern but to make it an essential oil burner as well.

An issue I ran into was figuring out how I would attach or not attach the oil tray.  Originally I wanted to add a lip to the cylinder itself on the inside that a separate tray could set on.  I asked Mrs. A for her professional opinion and she suggested even making a small flat circle that will fit just over the top of the cylinder, to look as a ”lid”… BUT then attach a shallow coiled bowl to the underside.  I then would carefully cut into the flat surface, without cutting through the coiled bowl, and smooth out to make the tray.

So far i have completed the oil tray and smoothed out the round cylinder.  Time to play with designs and to perfect.

Blog Post #9


                                                           TREE CACTUS

Bone Dry                                     Bisque                                            Fired


Above are three stages of my cactus vessel.

The idea of this project is to portray a “branch” up close.. YET when you zoom out and look at the bigger picture you can see it is a cactus.  Two of the most important elements in this artwork would be the coiling (for the tree texture) and the color scheme to emphasize the “branch”.

The meaning of this project is to look at the bigger picture.. to scope it out fully.  I had the coils flow together to sort of give off a rhythm to catch the eye.

I am very satisfied with my project.  The “Up Close” theme is portrayed well.  Accomplishing this project has taught me to be patient and  how to work with the moistness and dryness of the clay, as well as color contrasting.

Always learning something new.


Blog #8

WOOD CACTUS 


Above, you can see the before/ after image of my cactus vessel.  An issue for me was deciding whether I wanted to coil or use the scrafito technique.  I figured it would look more appealing to have the wood-grain texture pop off the cactus, to really emphasize the “wood” part of the piece.


I would say the most challenging part of this project was actually smoothing out the coils.  I got to use a few different tools to help me out.  Another challenge I had was the dryness of the clay itself.  It took me a while to decide where to put all the coils so that they would flow together, therefore limiting the moistness of my  piece.

Overall this piece has been so fun working on. As of now the piece is being fired.  I’m working on making a base to actually hold up the piece.

Blog Post #7


For this project I am in the process of making a wood- textured cactus. My maquette is uploaded above, as seen.

Artist Create:

It was difficult for me to decide what I wanted to create. I love the environment so I decided to work with two different plants. The cactus and the tree.. One being the form, the other.. texture.  Making the maquette, I decided exactly what ”wood texture” I was going to use and with what tools. The tool : being a pencil. I also decided that my real project was going to be hollow so the drying process would be quicker and the piece itself would be easier to work with.

Artist Communicate:

Up close, the piece may look like a branch.. as you zoom out you realize the true structure, being a cactus. I will paint the maquette to look as a branch, using browns to experiment how to make my main piece look good.

blog post 6

I learned that you make two pinch pots to make a sphere with trapped air. Which is the beginning stage to form the head. It was difficult for me to actually shape the head. For the most part it seemed to look like an egg. I improved my modeling skills working with the soft clay, sculpting the head. I used a paddle and my hands to form the head.  Hailey helped me form where the eyes would be.  I would say our whole table asked many questions to help out eachother. I watched videos and took notes on the Mimbres Tribe.  The whole activity helped the class by the discussion afterwards getting different perspectives and opinions.

Blog #5

I made two Japanese tea cups. My original plan was to make antique salt and pepper shakers. My inspiration for the salt and pepper shakers was found on google. I made a small slab for the base of my project and coiled up the sides. Noticing my “salt shaker” started to look more like a tea cup because of the widening of the sides, I decided to run with it. My project took a big turn but I am happy with it. It is quite plain, no handle, no foot… but it will become a simple, classy, fragile piece. after my piece has been fired in the kiln I am planning to leave the natural red clay color with an accent of white/tan. Though, my cups are not the same size.. I am excited to see how it turns out.

Blog Post #4

Artist Reflect/ Artist Collaborate, Utilitarian Project:

For my utilitarian project I made a soap dish. I applied a grey glaze to the soap dish. The piece was not very well put together: the glaze was uneven and the form itself was not smooth. I need to plan out ahead of time which form I will use. If I were to remake this soap dish…. 1. I would make a flat slab for the base 2. Make coils for the walls 3. Make coils for ridges in the bottom of this dish to keep the soap from getting stuck to the dish 4. Make sure there are not cracks and smooth out any rough areas 5. And finally.. glaze evenly.

To grow as an artist and improve my craftsmanship I will look at other classmates and/or pottery artist to reflect on. Many peers suggested adding something to bring up the soap off of the bottom of the piece so it would not stick. That comment definitely helped me out. Reflecting on other comments and work helps open up new perspective. By looking at Haley’s scrafitto project, she gave me the idea of carving flowers into my project.

Blog Post #3

I used slab building for this tube project. Step 1: I wrapped a cardboard tube with newspaper and taped it. Step 2: Gather some clay, wedge and flatten it, then roll the clay through the slab roller. Step 3: Make and use a template to cut out the slab piece. Step 4: Roll the clay onto the card board tube, cut any excess clay off. Step 5: Score the clay and smooth it out with a smoothed edge scraper. Step 6: Smooth, measure, cute and remove tube.

My artmaking skills have improved. I have become more patient with my work, making it more smooth and even.